This help article is for an old version of Direct Mail.
This page contains documentation for version 1 of our API, which is now deprecated. New projects should use version 2.
All connections to the API must be made using HTTPS. Unencrypted connections will fail.
Clients of the API must authenticate using HTTP Basic Authentication where the user-ID and password are the Key ID and Key Secret obtained ahead of time from the user's Direct Mail Account control panel (see the Authorization section below).
Authorization
Before the API is allowed to access user's data, there is a two-step authorization process that the user must complete:
Step 1: Generate an API key for your application
If your application does not already have an API key, the user will need to generate one for you:
- Open Direct Mail
- Choose Direct Mail > Direct Mail Account from the menu bar
- Scroll down to the "API Access" section and click Show
- Click Add New API Key

Direct Mail will generate a new Key ID, Key Secret pair. It is important that Key Secret is not shared with anyone. When authenticating with HTTP Basic Authentication, use the Key ID as the user-ID and Key Secret as the password.
The user can revoke your application's access to his or her data by revoking the key. Click the "X" icon next to the key to revoke it.
Step 2: Enable API Access on the user's subscribe form
Once your application has an API key, you still do not have access to the user's mailing list data. The user enables access to a particular mailing list (address group) by attaching a subscribe form to the address group and enabling API access on that form. Think of the subscribe form as a conduit through which your API can access the mailing list data. To attach a subscribe form and enable API access:
- Open Direct Mail and switch to the Addresses tab
- Select the address group you want to allow API access to
- Click Subscribe Form in the toolbar
- Switch to the Options tab
- Check the "Allow legacy API access" checkbox. You will want to note the Form ID for later.
- Click Create Form (or Update Form)
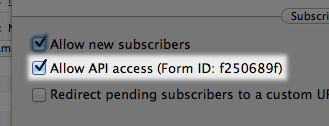
If the user does not want people to be able to subscribe to this form via the web (i.e. they only want to allow access via the API), then he or she can uncheck the "Allow new subscribers" checkbox.
Using the Form ID from step 5 above, you are now ready to use the API.